Available now on Etsy
“MAKING BEAUTIFUL ENCASED MURRINI BEADS”
A step by step tutorial for making gorgeous clear encased beads using your favorite murrini 🙂
Lampwork EBook Tutorial
by Christina Catherine of CCGlassArt
Includes:
**Over 200 color photographs**
**90 pages (with more than 80 pages of instruction!)**
**Detailed encased murrini bead instructions PLUS 6 design variations**
**Coral strands/stamen cane murrini recipe**
**A Torch-Side Reference Guide**
**Full color gallery of my encased murrini beads for inspiration**
…and SO much more!!
I’m back with another tutorial to teach you all the tips, tricks, techniques and secrets to creating GORGEOUS encased murrini beads! 😀
My first tutorial Making Beautiful Murrini was the prequel to this tutorial. It seemed natural to me that after teaching you how to make amazing murrini you would want to know the best ways to use them in your beads.
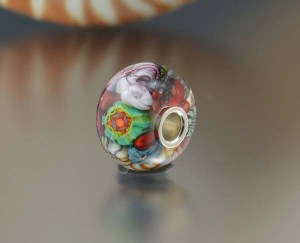
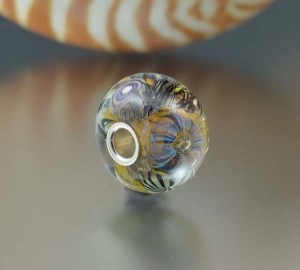
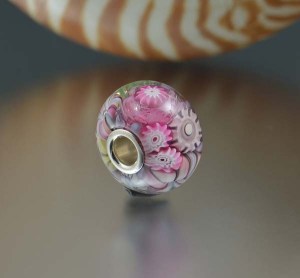
While I adore flattening murrini onto the surface of my beads, my absolute favorite way to use them is encased. There’s something so magical about peering into one of these beads to see all the little dimensional design elements suspended inside a thick layer of crystal clear glass.
My customers who buy these beads tell me how much they enjoy just staring at them. They seem to notice new things in the design each time they look at them.
This style bead is probably one of my all time best selling designs which I can hardly keep stocked. If I vary too much from this particular encased design the beads don’t sell nearly as quickly as these do. That has taught me a lot about what works and what doesn’t, and what customers really want in this style bead.
After making dozens and dozens (if not hundreds) of these beads, I have come up with a fool-proof formula that produces an amazing bead each and every time.
Before I developed this method of making encased murrini beads, I would approach this style bead rather haphazardly. The beads were good, but not always great in my opinion – at least not as great as I really wanted them to be, and my results were often hit and miss.
What I set out to do was create a reliable system, a series of steps that I could reproduce time and again (swapping out colors and different murrini designs on each bead), knowing that every time I would create a truly beautiful bead that my customers would love.
If you have tried making encased murrini beads before and struggled with getting consistent results, maybe even feeling like you were wasting too many expensive materials trying over and over to get it right like I used to do – this tutorial is for you!
I have put the most detailed instructions I could into this tutorial – which is why there are SO many photographs (over 200!) and 90 pages (over 80 of them instructional).
I wanted you to feel like I was standing right beside you, guiding you every step of the way. I didn’t want to leave out any bit of information that I thought would help you.
After learning my techniques you will be searching for every spare murrini chip you can find on your workbench to create these amazing encased murrini beads. I warn you, they are incredibly addicting!
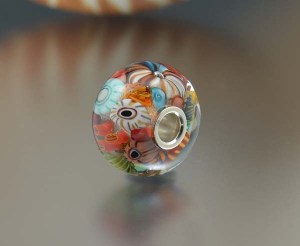
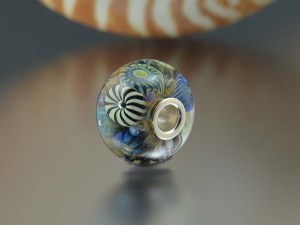
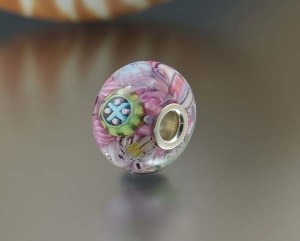
If you have my first tutorial, Making Beautiful Murrini, I know you already have a ton of your own murrini to use. In fact, if you have my first tutorial you can make an identical bead to the Basic Encased Murrini Bead taught in this tutorial, (and pictured above in the 2nd photo), since every murrini recipe taught in my first, murrini-making tutorial is used in this particular bead.
Of course, you can use any murrini you have on hand to make this bead. It is not necessary to use the exact ones I use – that’s the beauty of these encased murrini beads. There are infinite design possibilities! Any murrini you have available will work wonderfully in this style bead (keeping in mind that all glass used in your bead must be the same COE 😉
If you don’t have my first tutorial, and you want to give murrini making a try so you can create your own unique beads, I invite you to pick it up – it’s also available in my Etsy shop. I have gotten tons of positive feedback from people who have purchased my first tutorial and are finally experiencing great success making beautiful murrini.
Here’s a link to my first murrini-making tutorial: https://www.etsy.com/shop/CCGlassArt?section_id=10934686
—————————————————————————————————————————–
This tutorial is written with the intermediate to advanced glass artist in mind who is well familiar with all aspects of lampworking including working with an open flame, melting glass rods, all safety precautions, etc.
However, if you consider yourself a beginner and are thinking about purchasing this tutorial but are unsure if you will benefit from it, please contact me. I may be able to help you decide if this tutorial is right for you at your current level of experience. 🙂
Available now on Etsy!