With my recent purchase of an optic mold, I have begun a journey to make my own intricately striped murrini.
An optic mold is a small graphite vessel of any shape or size, in which you put a cylinder of hot, soft glass so that it  takes on whatever shape the mold happens to be. In my case I have a mold shaped like a flower with many ‘spokes’ to form indentations where I’ll add thin lines of color to create mulitple stripes on the outside of the murrini.
Once the layers of glass are all melted in and the cylinder molten, it is pulled into a long cane which stretches the design evenly throughout the glass.
This cane is then cross-cut into slices that are individually applied to lampwork beads to create tiny, beautiful intricate patterned designs such as the one seen above.
 Making my own murrini is something I’ve done for quite a while now, such as the simple
 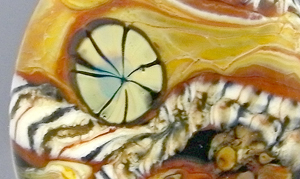 black striped Raku/Chalcedony murrini seen in these photos.
While these murrini are beautiful and I will always use this style in my work, I longed to make my own multiple striped murrini that is much more intricate with many different layers and colors of glass.
For this type of multiple-striped murrini, the use of an optic mold is essential in order to create dozens of evenly spaced lines.
There is definitely a learning curve of understanding how the different glass colors interact with each other once they’re stretched into long canes. Many glass colors simply do not contain enough pigment in order to retain their brilliant colors once pulled so thin. I can see that I will need to do much experimenting and keep careful notes in order to come up with successful murrini designs and color combinations.
 Another type of murrini I’ve recently made, that does not require the use of an optic mold, was a pretty flower murrini in California Poppy colors.
This murrini is constructed in much the same way regular, striped murrini is made – but in a ‘reverse painting’ manner. That is, the glass must be layered with the inner colors of the petals applied first, instead of last as they usually are, since the murrini is to be fanned out instead of pulled inward.
Construction of this type of murrini requires a few more steps, such as building the stamens in the center of the flower. These are multiple strands of clear encased opaque glass in colors such as green, brown and yellow.
Application of the flower murrini is a little tricky as well. With traditional murrini you want the stripes on the outside to point toward the center creating a ‘spoked’ pattern (like a bicycle wheel). With flower murrini you use the heat of the flame and special metal tools to help push the petals outward, as a blooming flower would look. However, when heat is applied to these little murrini chips the glass has a strong desire to curl inward toward the center – so careful heat control must be used along with the use of the tools to achieve the desired, natural open-flower look.
I currently have 2 sets up on eBay that both include beads containing my new California Poppy flower murrini:

WATERLILY – available till Sunday on eBay.
 BRONZE AGE – available till Sunday on eBay.
Until next time,
CC
http://www.ccglassart.com


 While Pandora beads have been around for a while now, I really did not take much notice of them until this past Christmas when the commercially made beads were being advertised all over the place.


 CORONADO – available till Sunday on eBay.
 TAPESTRY – available till Sunday on eBay.