This might just be a record – for the first time in probably 2, or maybe even 3, years I have an entire batch of new beads without one…single…murrini chip in them! 😮
It’s definitely a departure from my usual bead-making routine. But, you know what, it was really fun! I let my mind roam free with these bead designs – drawing on techniques I haven’t done for years, and some new techniques too! It’s almost like a creative-reset, and was actually a very refreshing change!
But I will admit, I already have in mind a couple murrini bead designs planned for my next torching session. Guess that break won’t last very long…haha! 😀
In this video I make a small bead with my own handblown shards!
Shards are thin sheets of blown glass that can be wrapped around beads to add interest and detail to a design. I used shards quite a lot back when I was making large focals. But applying them to small beads can be a bit tricky. Especially if you are using reactive shards that tend to move while they melt in the heat of the flame.
I hope you enjoy it!
Please note: This video is a demonstration for entertainment purposes only.
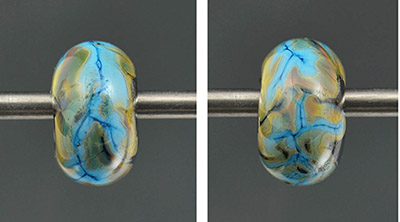
A photo of the finished bead after kiln annealing…
I have been obsessed with making encased murrini beads, (and pretty much ONLY encased murrini beads), for the past 2-3 years. And while I still love making them, it is nice to allow my creativity to flow in other directions once in a while. 😀
I also have been thinking it would be nice to offer simpler, less intricate (and less expensive), beads that can compliment my encased murrini charm beads. While I love wearing an entire charm bracelet full of my Reef series beads – I think most people like to use them as accent pieces on a bracelet of many different designs in coordinating colors.
Many of these new charm bracelet beads I’ll be introducing are actually glass designs I have been using for many years in other types of jewelry beads. It will be a fun challenge to re-interpret them on a much smaller scale in my European-style charm bracelet beads. 🙂
Here’s another YouTube video I made while testing murrini. Whenever I make murrini I always test it on white glass to see a true representation of the colors. Also it helps me to see how the murrini behaves in the flame and when applied.
Here are some pictures of the murrini I used during the video after kiln annealing –
There is no speaking or teaching in this video, it is just a demonstration for entertainment purposes only.*
*Because this video is only a demonstration for entertainment purposes, and not for instruction as a tutorial, I will not be offering any advice or information as to the colors, tools or techniques I use. If you learn something new, that’s great! But the video is really just for your enjoyment.
Disclaimer: please do not attempt these techniques unless you are well skilled in working with molten glass in an open flame – if you do try these techniques you assume all responsibility for the outcome of your efforts and agree that you are aware of and will comply with any and all safety precautions associated with making glass beads including but not limited to proper ventilation of your work environment, wearing safety glasses and appropriate clothing, use of an open flame, working with hot glass, being careful around sharp glass, etc., etc… CCGlassArt cannot be held responsible for any negative results you may incur attempting these techniques.
I have been having a lot of fun finishing off my encased murrini beads with these pretty caps! The beads are slightly bigger than my usual charm bracelet beads which just means I can fit even MORE murrini and other glass elements into them. 😀
The caps (in sterling silver, warm gold brass, and solid copper) really dress up the beads. They also add versatility since each bead would look just as lovely worn as a focal on a necklace as they do on a charm bracelet as a centerpiece bead.