Featured

Tutorial! “Making Beautiful Murrini”

Now available on Etsy - click to purchase

MAKING BEAUTIFUL MURRINI” Step-by-Step Tutorial
by Christina Catherine of CCGlassArt

Includes:

**Over 100 color photographs**
**More than 50 pages of instruction**
**Four murrini recipes including my super popular Starlight Murrini recipe**
**A Torch-Side Reference Guide**
…and SO much more!!

This tutorial is for every lampworker who has wanted to make murrini but didn’t because they were intimidated by the process, or perhaps has tried making murrini – spending many hours at the torch and using up lots of glass – only to be disappointed with the end result.

I was one of those lampworkers myself. I spent more hours and wasted more glass than I care to admit making hundreds of murrini canes with nothing worth using to show for it. Until, after much trial and error, I finally developed a fool-proof method and a series of reliable techniques, tips and tricks that helped me produce consistent results every time.

Once you learn to successfully make your own murrini cane the sky’s the limit! You can make custom designs anytime you want, in any colors you want. You can make murrini specifically for the style of beads you create.

You will be able to set your beads apart from the crowd making them more unique and individualized with murrini in color combinations and patterns you develop that are unavailable anywhere else.

You can even sell or share your extra murrini with other lampworkers (or fusers)!

Topics covered this tutorial include:

*Learn to create a 5 layer murrini design with up to 24 outer stripes (that will look like 48!)
*Choosing the best colors (I use COE 104 but you can easily adapt these tips and techniques to other COE glass)
*How to know which colors will work well together (and which colors to avoid)
*The entire process of making murrini cane from start to finish, step-by-step
*How to remove trapped air bubbles from encasing
*Getting multiple stringer lines spaced evenly and straight all the way around
*What to do when your stringer pops off unexpectedly
*Pulling the cane to a uniform diameter
*What to do with waste glass leftover from making murrini cane
*How best to apply murrini chips to your beads
…and tons more…

Making murrini can be intimidating but it doesn’t have to be. When broken down into easy-to-follow instructions, (with color photos guiding you every step of the way), you will have all the information you need – and the confidence – to successfully create beautiful, miniature designs in murrini that will take your beads to the next level.

This tutorial is written with the intermediate to advanced glass artist in mind who is well familiar with all aspects of lampworking including working with an open flame, melting glass rods, all safety precautions, etc.

However, if you consider yourself a beginner and are thinking about purchasing this tutorial but are unsure if you will benefit from it, please contact me. I may be able to help you decide if this tutorial is right for you at your current level of experience. 🙂

The Making of Murrini

With my recent purchase of an optic mold, I have begun a journey to make my own intricately striped murrini.

An optic mold is a small graphite vessel of any shape or size, in which you put a cylinder of hot, soft glass so that it takes on whatever shape the mold happens to be. In my case I have a mold shaped like a flower with many ‘spokes’ to form indentations where I’ll add thin lines of color to create mulitple stripes on the outside of the murrini.

Once the layers of glass are all melted in and the cylinder molten, it is pulled into a long cane which stretches the design evenly throughout the glass.

This cane is then cross-cut into slices that are individually applied to lampwork beads to create tiny, beautiful intricate patterned designs such as the one seen above.

Making my own murrini is something I’ve done for quite a while now, such as the simple 
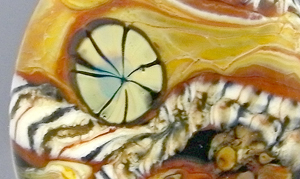
black striped Raku/Chalcedony murrini seen in these photos.

While these murrini are beautiful and I will always use this style in my work, I longed to make my own multiple striped murrini that is much more intricate with many different layers and colors of glass.

For this type of multiple-striped murrini, the use of an optic mold is essential in order to create dozens of evenly spaced lines.

There is definitely a learning curve of understanding how the different glass colors interact with each other once they’re stretched into long canes. Many glass colors simply do not contain enough pigment in order to retain their brilliant colors once pulled so thin. I can see that I will need to do much experimenting and keep careful notes in order to come up with successful murrini designs and color combinations.

Another type of murrini I’ve recently made, that does not require the use of an optic mold, was a pretty flower murrini in California Poppy colors.

This murrini is constructed in much the same way regular, striped murrini is made – but in a ‘reverse painting’ manner. That is, the glass must be layered with the inner colors of the petals applied first, instead of last as they usually are, since the murrini is to be fanned out instead of pulled inward.

Construction of this type of murrini requires a few more steps, such as building the stamens in the center of the flower. These are multiple strands of clear encased opaque glass in colors such as green, brown and yellow.

Application of the flower murrini is a little tricky as well. With traditional murrini you want the stripes on the outside to point toward the center creating a ‘spoked’ pattern (like a bicycle wheel). With flower murrini you use the heat of the flame and special metal tools to help push the petals outward, as a blooming flower would look. However, when heat is applied to these little murrini chips the glass has a strong desire to curl inward toward the center – so careful heat control must be used along with the use of the tools to achieve the desired, natural open-flower look.

I currently have 2 sets up on eBay that both include beads containing my new California Poppy flower murrini:

WATERLILY – available till Sunday on eBay.

BRONZE AGE – available till Sunday on eBay.

Until next time,

CC
http://www.ccglassart.com

The Netflix of Music

sansa

Whenever I am at the torch I always listen to my iPod (remember when we called them ‘walkmans’?) But now that I am torching upwards of 10-15 hours a week, or more, I am quickly growing tired of listening to my same playlist over and over.

Recently I found out my local library offers audiobook downloads for free, I just needed to get a compatible player. So I purchased a cheap, little portable device called a Sansa mp3 player. It clips onto your shirt, just like my iPod shuffle, but can play all my mp3’s as well as the audiobooks.

When I looked through the inserts that came with my new Sansa player, I noticed an advertisement for Rhapsody.com. It offered a free 30 day trial so I signed up to try it.

Much to my surprise this service was a lot more than just another iTunes! You pay a monthly subscription fee and download as much music as you want as often as you want. You can either just rent the music, or choose to pay for the songs if you want to keep them forever (.99 cents each). I get sick of music so quickly, I can’t see myself buying music too much anymore.

However, if you still like buying music, not only is Rhapsody less expensive per song than iTunes, BUT as a subscriber you can listen to the entire length of every song before purchasing it. I know I’ve bought a lot of ‘duds’ because the 30 second clip sounded great, but the rest of the song…not so much!

Because I’m just renting the music I know I will change out songs often and will be able to listen to so much more music than I would if I had to purchase each individual song (especially with iTunes raising the prices of most their songs to $1.29 each!) I wouldn’t ordinarily let myself buy as much music as I would really like to listen to just to keep my playlist ‘fresh’.

Rhapsody charges $12.99 a month for downloading the rented music on up to 3 computers. If you want the ability to also download the music to a portable device, it’s an extra $2 a month.

I guess if I ever got to the point where I didn’t want to buy as much music to justify spending the $14.99 a month then it wouldn’t be worth it. But because I’m listening to my iPod for up to 20 hours a week, this type of service is great for me!

Oh! Rhapsody also has a feature where you can upload their preselected music ‘channels’ (grouped by genre, artist or your own custom choices) to your compatible portable device, and everytime you connect to their website this playlist of music refreshes with new content. How awesome is that?!

Between using Rhapsody and the free audiobooks from my library, I’ll never get bored listening to the same songs over and over again while torching – woo hoo!

CC

Satake Soup

Satake Glass Rods

A while ago, I purchased a small stash of Japanese Satake glass rods. I kept hearing that this glass that is a ‘match made in heaven’ for those of us with single fuel torches. So I just had to try it!

When I first got it and tried it, it was a disaster! I boiled every color to smitherines! Since then, those beautiful glass rods have just been in a lonley corner of my studio collecting dust…literally.

Then, a couple days ago, I decided to try using this glass again. This attempt was slightly more successful than the last.

Satake glass turns to drippy molten soup in an instant making it very difficult to control, much less achieve a pleasing and symmetrical shape. I did manage a nice bi-colored tab bead and heart. BUT……what I forgot, is that Satake glass anneals at a lower temperature than the Italian/German glass I normally use. So when I pulled these Satake beads out of the kiln the next morning…this is what I saw…

Satake HeartSatake Disk


You can see how the glass slumped in the kiln. Also, the brown on the disk-shaped bead ended up overheating and discoloring a bit, turning more metallic.

This is a very tricky glass and one that I probably won’t be using often as the methods I’ve grown accustomed to simply don’t apply to Satake. It is also considerably more expensive, so although it’s fun to play with, the most I will probably do with this glass in the future is just make spacer beads with it.

C.C.